Moist & Juicy Make-Ahead Turkey
Once you bake this Moist & Juicy Make-Ahead Turkey. You’ll never stress over preparing your turkey again. It’s rubbed with a simple dry brine and refrigerated ahead of time. The skin turns into a crispy outer coating that seals in all the juices. It couldn’t be more perfect!
I don’t like experimenting with new recipes on the holidays, especially on major holidays like Thanksgiving and Christmas. With that being said, I was watching Ina Garten’s cook show during the hot days of August when I was cranking up the air and pretending it was November. Sorry…I’m not a fan of heat and humidity.
The episode I was watching really caught my attention. Ina was making an entire Thanksgiving meal that could be made ahead of time and taste super delicious the day it was served. Her turkey was super moist and her gravy and sides looked just as good. That got me to thinking. Labor Day was just around the corner, and with Covid 19, I wasn’t planning a family gathering. A perfect time to experiment! I made a trip to my local grocery store, leery that I would even find a turkey the week before Labor Day, but to my surprise, they had just stocked several turkeys in the meat department. The rest is history!
I don’t know about you, but I think the holidays are rather stressful. I spend the day before Thanksgiving making my dressing and all my desserts. That’s a long day in the kitchen. The next morning I usually get up at 5 a.m. to get my turkey ready to go in the oven. By 8 o’clock I’m back in the kitchen mixing yeast roll dough for its first rise and prepping sides. That’s why I was so excited to try this moist & juicy make-ahead turkey.
Steps for making this turkey
Here are the steps for making a moist & juicy make-ahead turkey!!
- Thaw the turkey: You need a 12-14 pound turkey for this recipe. I actually used a 23-pound turkey. Thaw the turkey in the refrigerator. It needs to be totally thawed about 3 days prior to the day you’re serving it. Look at your packaging for proper thawing directions.
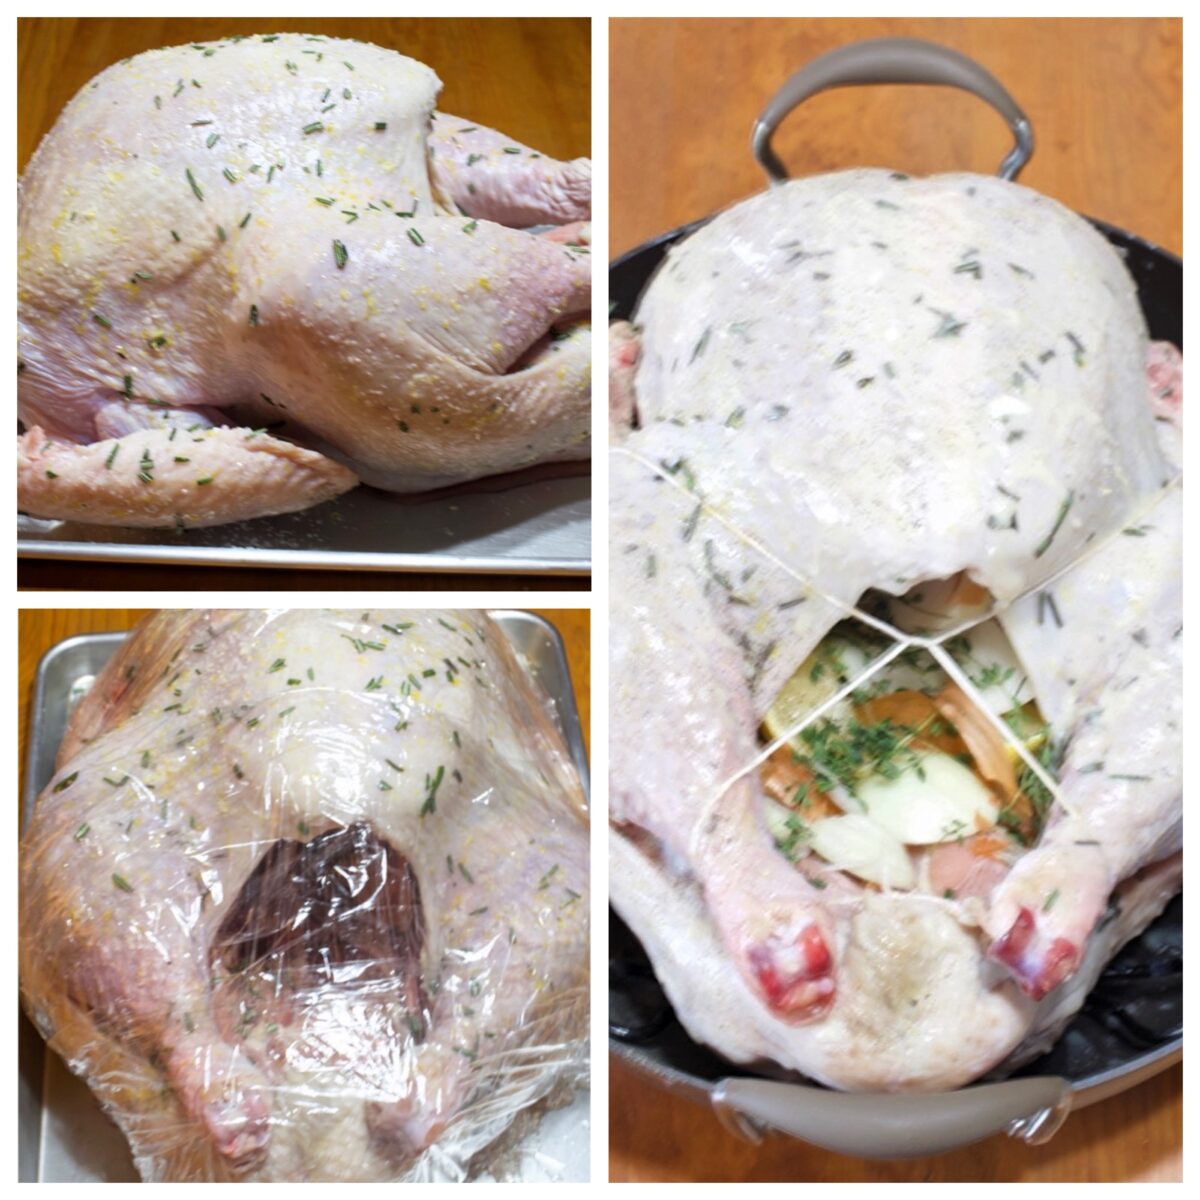
- Clean the turkey: Three days prior to baking the turkey, wash the turkey inside and out and drain it for at least 5 minutes until it’s thoroughly drained. Pat the turkey dry with paper towels, including the inside cavity.
- Make the brine: In a small bowl, combine 3 tablespoons salt, 1 tablespoon fresh minced rosemary, and the zest of one lemon.
- Rub the turkey: Sprinkle 1 tablespoon of the brine mixture in the cavity. Rub the remaining brine mixture all over the turkey, making sure to get under the legs and wings.
- Wrap & refrigerate: Place the turkey on a shallow baking sheet and wrap it securely with plastic wrap. Refrigerate the turkey for at least 1 day. Remove the turkey from the refrigerator, remove the plastic wrap, and drain any juices from the pan. Return the turkey to the refrigerator for 1 day, unwrapped. The skin will dry out and look semi-translucent. Don’t skip this step, it’s important.
- Prep the turkey to bake: Preheat oven to 425 degrees. Place the turkey in a large roasting pan, discarding any juices from the first pan. Optional: Place a cut-up onion & lemon, and a few thyme sprigs in the cavity. I did this, but you don’t have to. I’m not sure how much of a difference this really makes. Also, if you’re planning on stuffing your turkey, omit this step.
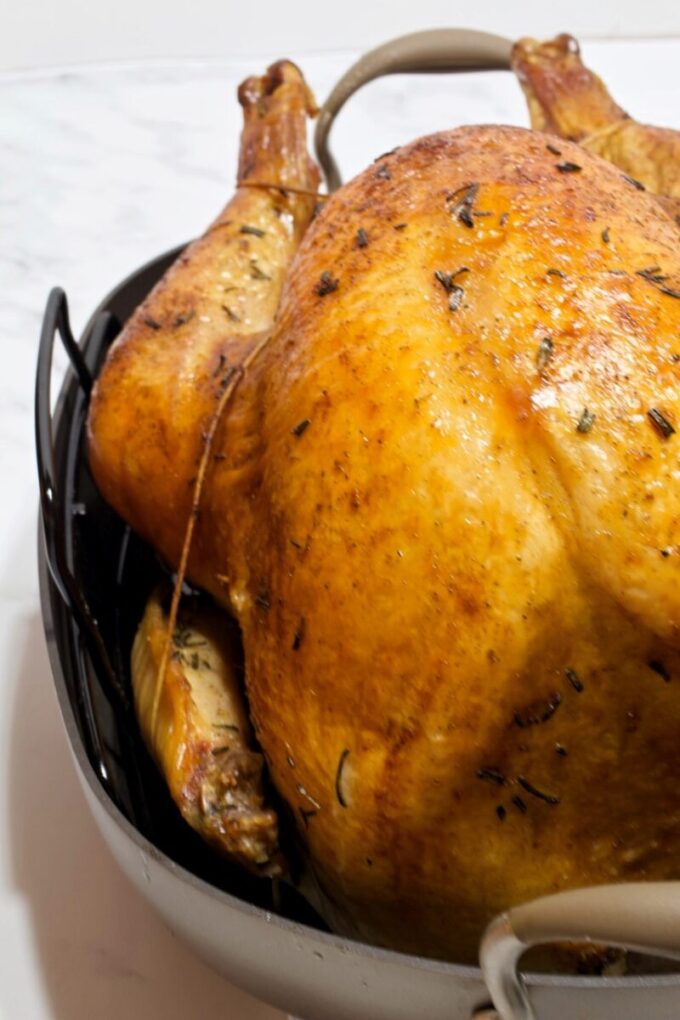
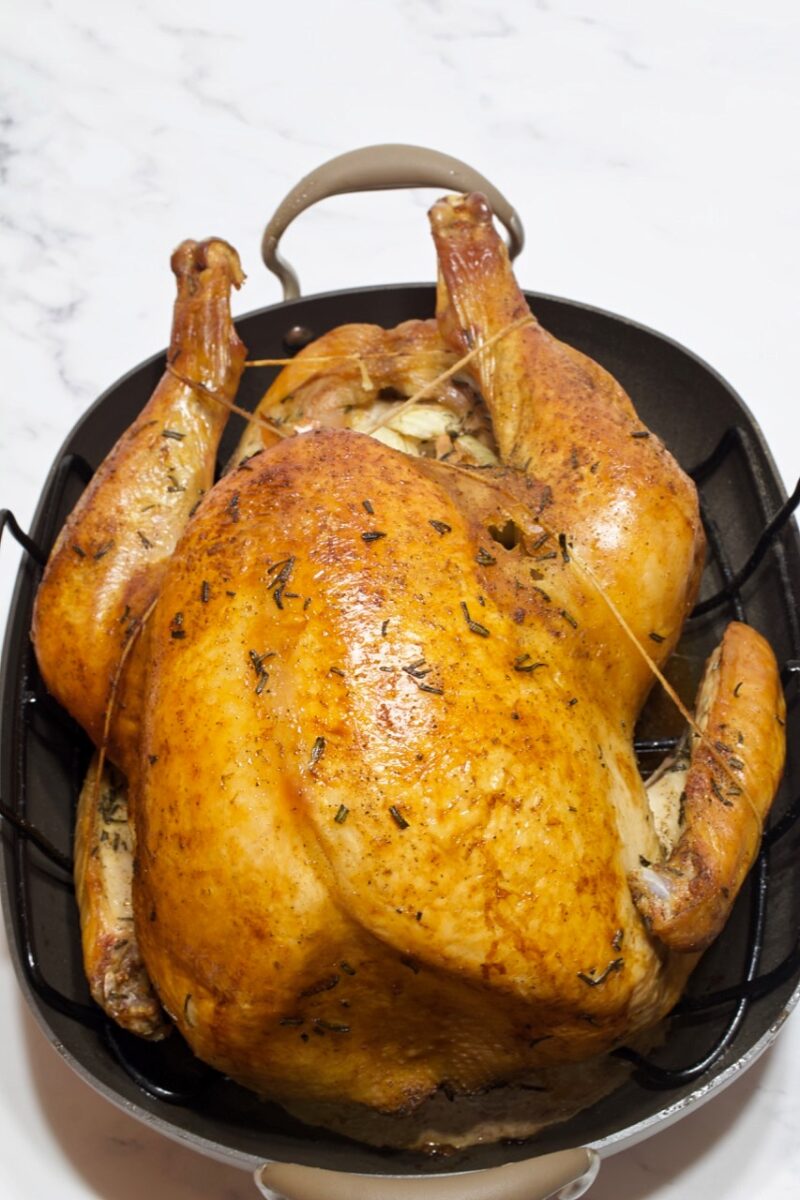
- Truss the turkey: Using a long piece of kitchen twine, place the twine under the turkey and bring it up over the wings, looping the twine one time near the front of the turkey and bringing it taut. Run the twine under the legs and bring it up taut and tie it off in a knot. Snip off excess twine. The twine will hold the wings and legs close to the turkey for even cooking. Brush the turkey all over with melted butter and sprinkle generously with salt and pepper.
- Bake the turkey: Bake the turkey for 45 minutes and reduce the heat to 325 degrees. Bake for an additional hour and check the turkey for doneness using an instant-read thermometer. Check the breast and thigh areas. The breast should read 165 degrees and the thigh at 180 degrees. If the turkey isn’t done, check it again every 15 minutes until the thermometer reads the correct temperature.
- Remove the turkey from the oven and place it on a carving board. Do not discard the drippings in the roasting pan. You’ll want them for your gravy.
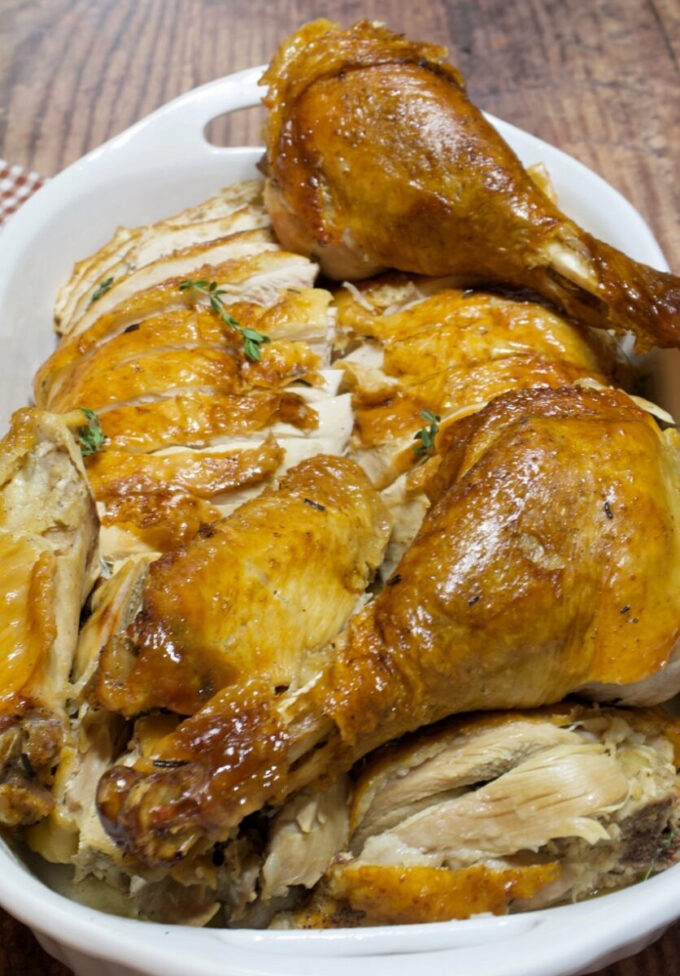
- Carve the turkey: Have ready, an ovenproof serving platter. Remove the strings. Carve the turkey and place it on the turkey platter in the following order. See notes below for pouring gravy on the platter first**. Cut off each leg, using a sharp chef’s knife. Move the knife around the bone to release the leg. This might take a minute. Next cut off the thighs. Wiggle the knife around to see exactly where the joint is. Next, remove each wing by cutting around it in one piece. Lastly, cut off each breast. Cut each one off in one big piece, cutting it as close to the bone as possible. Instead of cutting thin slices of breast, cut the breast, starting at a short end, and slice it into thick pieces, about 1/2 inch in thickness. This keeps the breast from becoming dry and stringy. Slice the thighs on the long side in thick slices. The dark meat doesn’t become stringy like the white. Then place the wings on your platter whole or halved.
WHITE MEAT TIP
Don’t try to slice off thin slices of turkey from the breast while it’s still on the whole bird. Remove the entire breast and place it on a carving board. Then slice it longways in thick 1/2 inch slices. It will not become stringy and it will be moister. See picture above.
Doneness tip
If you don’t have a meat thermometer, and the legs and thighs look pinkish in color when you cut them from the turkey, do the following: Cover the rest of the turkey with heavy foil. Return the legs and thighs to the oven for about 15 to 20 minutes until an instant-read thermometer reads 180 degrees. Transfer the dark meat back to the carving board with the white meat, cover with foil, and allow it to rest for 30 minutes.
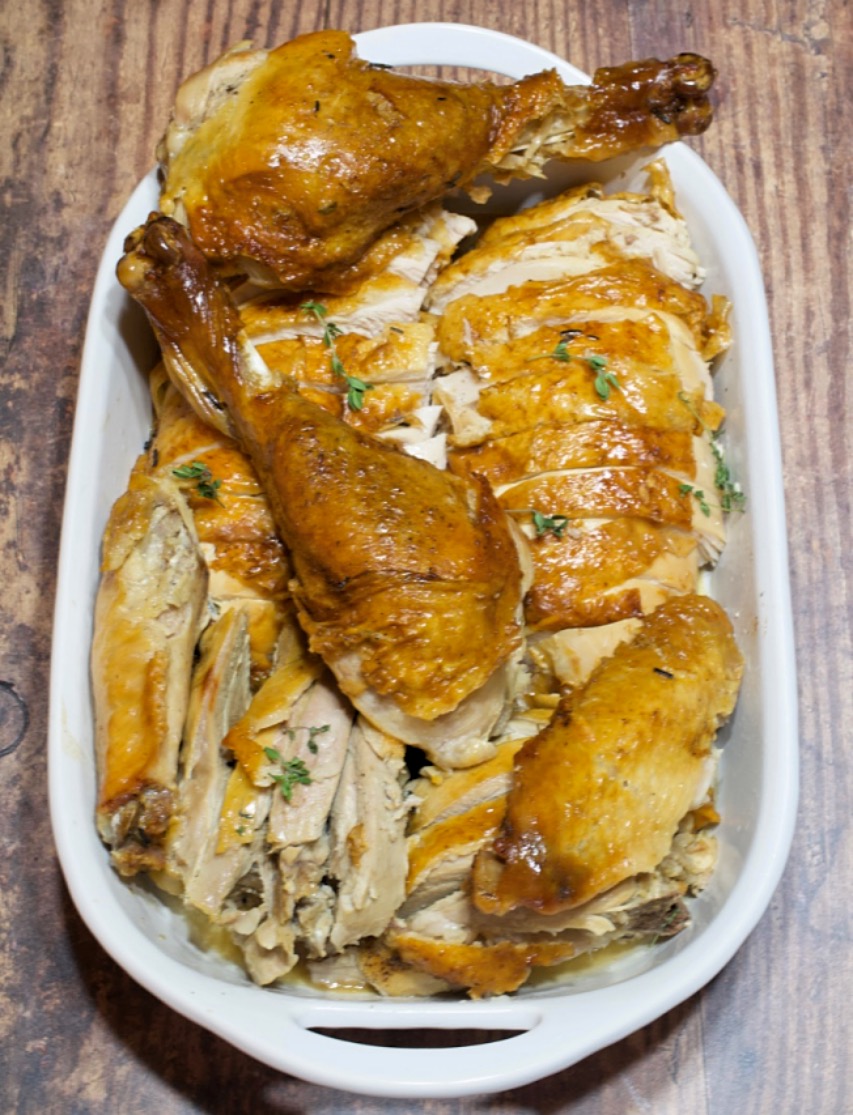
Many turkey platters aren’t oven-proof. Mine isn’t. That’s why I used a 9 x 13 ovenproof dish to place my turkey in. Remember you’re fixing this turkey the day before and you’ll be reheating it in the oven, so make sure you choose an ovenproof platter or dish for reheating the turkey.
Serve this moist & juicy make-ahead turkey with this easy Make-Ahead Onion & Sage Turkey Gravy.
If you make this recipe please rate it, and leave a comment below on how you liked it. I love hearing from you.
Wanna see different recipes each day? Feel free to follow me on Facebook, Pinterest, & Instagram.
Print
Moist And Juicy Make Ahead Turkey
- Prep Time: 45 minutes
- Cook Time: 1 hour 45 min
- Total Time: 2 hours 30 minutes
- Yield: 10 servings 1x
- Category: Dinner
- Method: Bake
- Cuisine: American
Description
This make-ahead turkey is super moist & juicy and will save you SO much time on Thanksgiving day!
Ingredients
DRY BRINE
- 3 tablespoons kosher salt
- 1 tablespoon fresh minced rosemary
- Zest of 1 lemon
TURKEY
- 1 (12-14) pound fresh turkey*
- 1 large unpeeled yellow onion cut into eighths
- 8 sprigs of fresh thyme
- 1 lemon, quartered
- 1/2 stick unsalted butter, melted
- Salt & pepper
Instructions
DRY BRINE
- In a small bowl, combine the salt, rosemary, and lemon zest. Set aside.
TURKEY
- Two to three days before baking the turkey, wash the turkey inside and out and drain it for at least 5 minutes until it’s thoroughly drained. Pat the turkey dry with paper towels, including the inside cavity.
- Sprinkle 1 tablespoon of the salt mixture in the cavity. Rub the remaining salt mixture all over the turkey, making sure to get under the legs and wings.
- Place the turkey on a shallow baking sheet and wrap it securely with plastic wrap. Refrigerate the turkey for at least 1 to 2 days. Remove the turkey from the refrigerator, remove the plastic wrap, and drain any juices from the pan. Return the turkey to the refrigerator for 1 day, unwrapped. The skin will dry out and look semi-translucent. Don’t skip this step, it’s important.
- Preheat oven to 425 degrees. Place the turkey in a large roasting pan, discarding any juices from the first pan. Place the onion, lemon, and thyme sprigs in the cavity. Truss the turkey: Using a long piece of kitchen twine, place the twine under the turkey and bring it up over the wings, looping the twine one time near the front of the turkey and bringing it taut. Run the twine under the legs and bring it up taut and tie it off in a knot. Snip off excess twine. The twine will hold the wings and legs close to the turkey for even cooking. Brush the turkey all over with the melted butter and sprinkle generously with salt and pepper.
- Bake the turkey for 45 minutes and reduce the heat to 325 degrees. Bake for an additional hour and check the turkey for doneness using an instant-read thermometer. Check the breast and thigh areas. The breast should read 165 degrees and the thigh at 180 degrees. If the turkey isn’t done, check it again every 15 minutes until the thermometer reads the correct temperature.
- Remove the turkey from the oven and place it on a carving board. Do not discard the drippings in the roasting pan. Cut off the legs and thighs***. Allow the turkey to rest for at least 20 to 30 minutes.
- Carve the turkey: Have ready, an ovenproof serving platter. Remove the strings. Carve the turkey and place it on the turkey platter in the following order. See notes below for pouring gravy on the platter first**. Cut off each leg, using a sharp chef’s knife. Move the knife around the bone to release the leg. This might take a minute. Next cut off the thighs. Wiggle the knife around to see exactly where the joint is. Next, remove each wing by cutting around it in one piece. Lastly, cut off each breast. Cut each one off in one big piece, cutting it as close to the bone as possible. Instead of cutting thin slices of breast, cut the breast, starting at a short end, and slice it into thick pieces, about 1/2 inch in thickness. This keeps the breast from becoming dry and stringy. Slice the thighs on the long side in thick slices. The dark meat doesn’t become stringy like the white. Then place the wings on your platter whole or halved.
- Cover the turkey tightly with foil and refrigerate. The following day, remove the turkey from the refrigerator 1 hour before reheating it. Preheat oven to 325 degrees. Heat covered turkey for about 20 to 30 minutes until it’s heated through and serve.
- Cover and wrap leftovers right away to prevent them from drying out.
This recipe was slightly adapted from Ina Garten’s recipe for Make-Ahead Turkey.
Notes
- *The ingredient amounts are for a 12 to 14-pound turkey. However, I used the same ingredients for a 23-pound turkey and it was perfect! Also, the 23-pound turkey took approximately 3 1/2 hours to bake.
- **For added moistness to the turkey, make your gravy and pour some of it onto the turkey platter before placing the turkey on it.
- ***If you don’t have a meat thermometer, and the legs and thighs look pinkish in color when you cut them from the turkey, do the following: Cover the rest of the turkey with heavy foil. Return the legs and thighs to the oven for about 15 to 20 minutes until an instant-read thermometer reads 180 degrees. Transfer the dark meat back to the carving board with the white meat, cover with foil, and allow it to rest for 30 minutes.
- Important tip: There’s a lot of kosher salt in this recipe. Be careful with adding more salt when you get ready to bake it. Also, if you use your turkey pan to make your gravy in, it might be extra salty from the excess kosher salt falling into the bottom of the pan. I use a skillet for my gravy and strain the drippings before adding them to the skillet. I add extra pepper but no added salt.
Do you cover turkey when cooking?
Hi Denise, No you don’t.
I made this recipe with a 21 pound turkey and it turned out great! I was a little concerned trying a new recipe when having guests but I wanted to avoid the mess of carving the turkey on the day of the dinner. This recipe was simple and worked! The turkey was moist and had great flavor. Will definitely use this recipe again.
Hi Linda, I’m so glad it turned out great for you. I thought it was a great recipe…very moist.