Tender & Flaky Buttermilk Biscuits
These Tender & Flaky Buttermilk Biscuits will become your favorite. Made with buttermilk, they are tender, buttery, and flaky, and they take no time to make. A great breakfast biscuit!
HAPPY NATIONAL BISCUIT DAY!!! I posted this recipe exactly 3 years ago on National Biscuit Day, and I’m reposting it today with some updated tips. I’ve been making biscuits since I was 5 years old with my mom and I could eat my weight in biscuits. Oh wait, I think I have!!
Did you know, there are many different types of biscuits, flaky layered, soft & airy, drop biscuits, cathead biscuits, cream cheese biscuits,…too many to name! When I was a little girl, (tomboy), my mom would wrap up the leftover biscuits from breakfast and let me take them with me on my day of adventures in the woods. I’d share them with my pony, sit on a swinging bridge and eat them while I played my harmonica or sometimes I’d share one with the birds. Whether they were hot or cold, I loved them.
Biscuits are one of the easiest breads to make. If you follow my easy tips below, you’ll make perfect biscuits every time, and once you see how easy it is to make them, you’ll never buy canned biscuits again.
TIPS FOR MAKING HOMEMADE BISCUITS
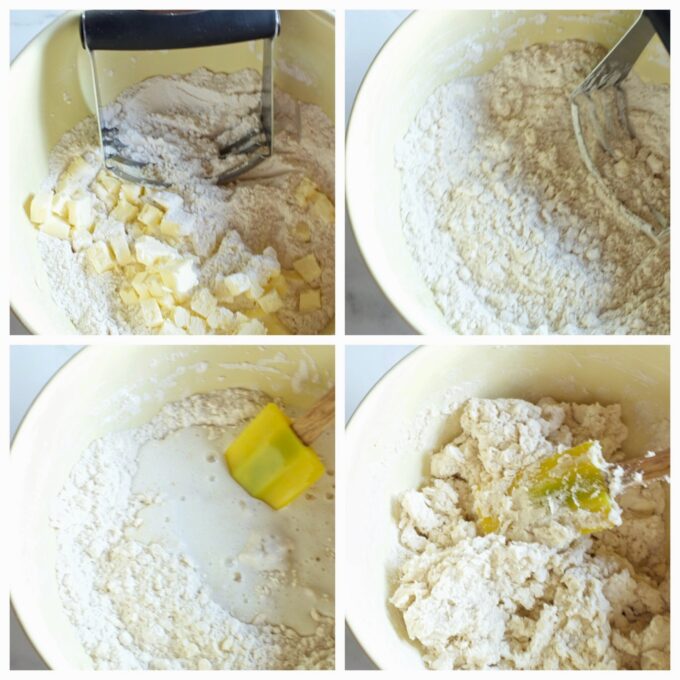
- Butter: It’s imperative to use very cold butter in your biscuit dough. Cut the butter into small pieces and cut it into the dough with a pastry blender. If you don’t have a pastry blender, use a fork and a knife. Why cold butter? As the biscuits bake, the small chunks of butter slowly melt into the biscuits, creating air pockets which in turn make the biscuits nice and airy.
- Buttermilk: Buttermilk adds a tangy richness to biscuits, and because it’s acidic, it adds tenderness to baked goods such as biscuits. Make sure you use cold full-fat buttermilk.
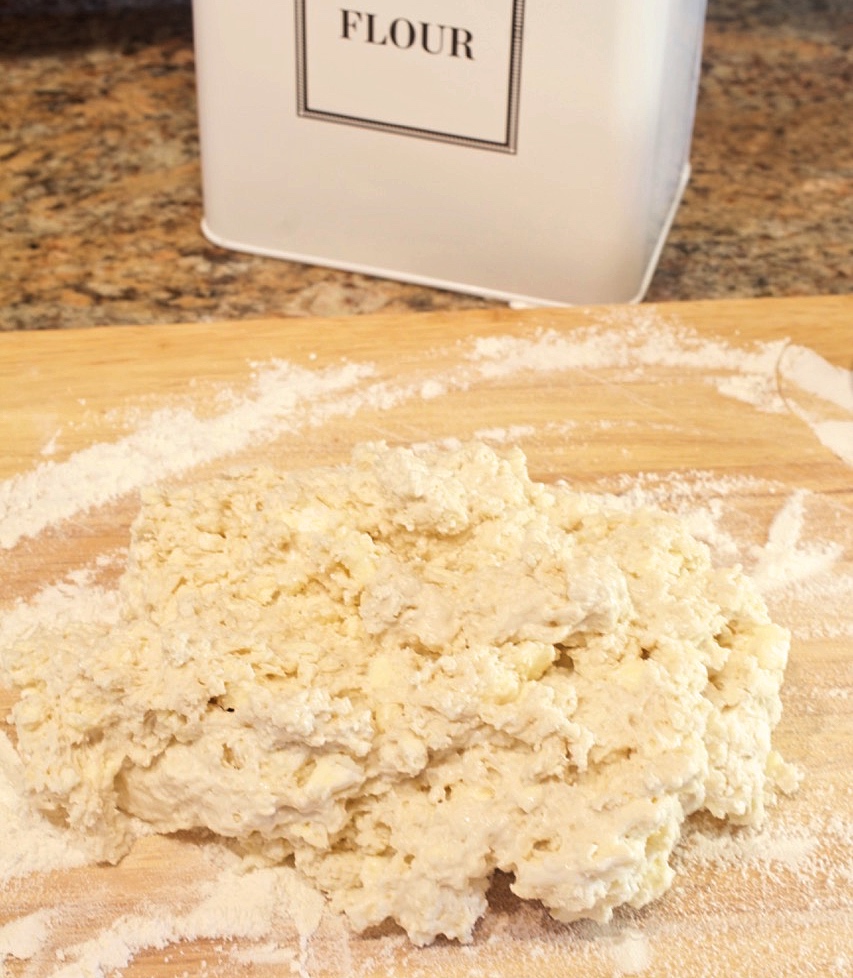
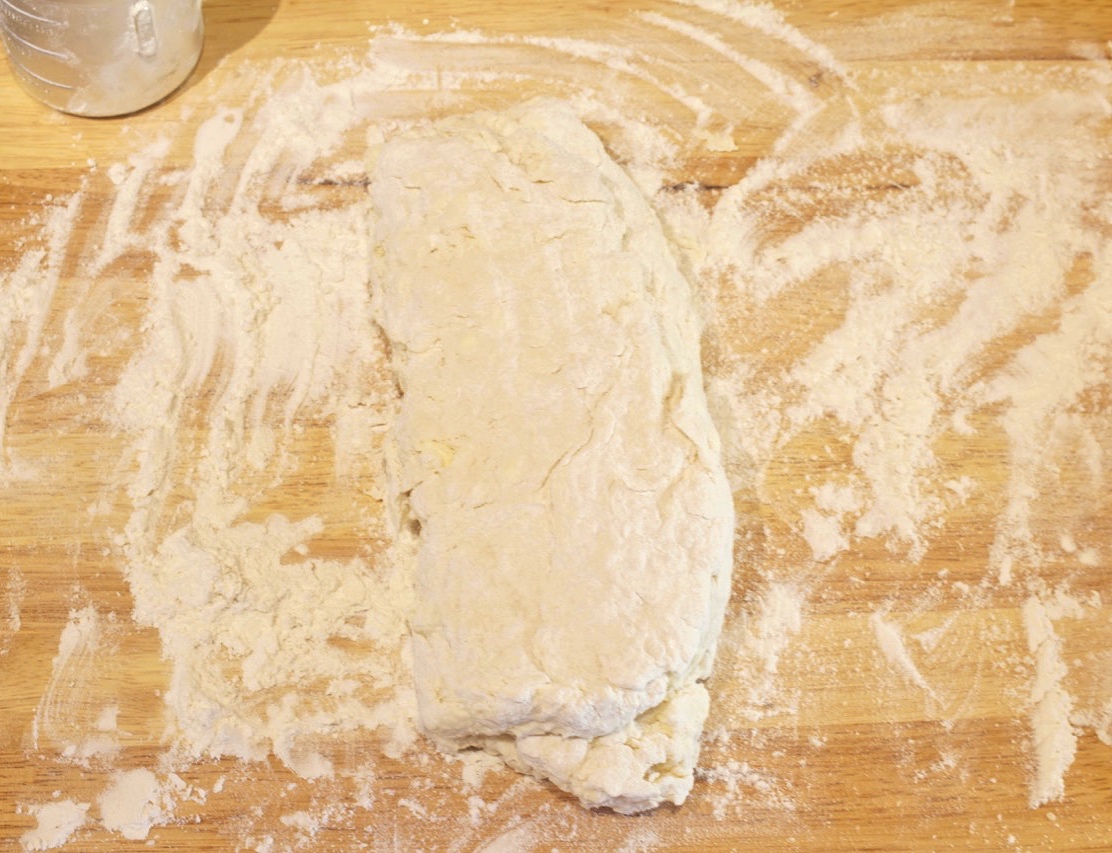
- Working the dough: Do not overwork the dough. Once you’ve added the wet to the dry ingredients, use a spatula or wooden spoon to gently fold the dry ingredients into the wet. Once all of the dry ingredients are wet, stop! See the picture above. The dough will be wet and messy but that’s okay. Dump it onto a lightly floured work surface where you’ll add more flour as you fold it. See below.
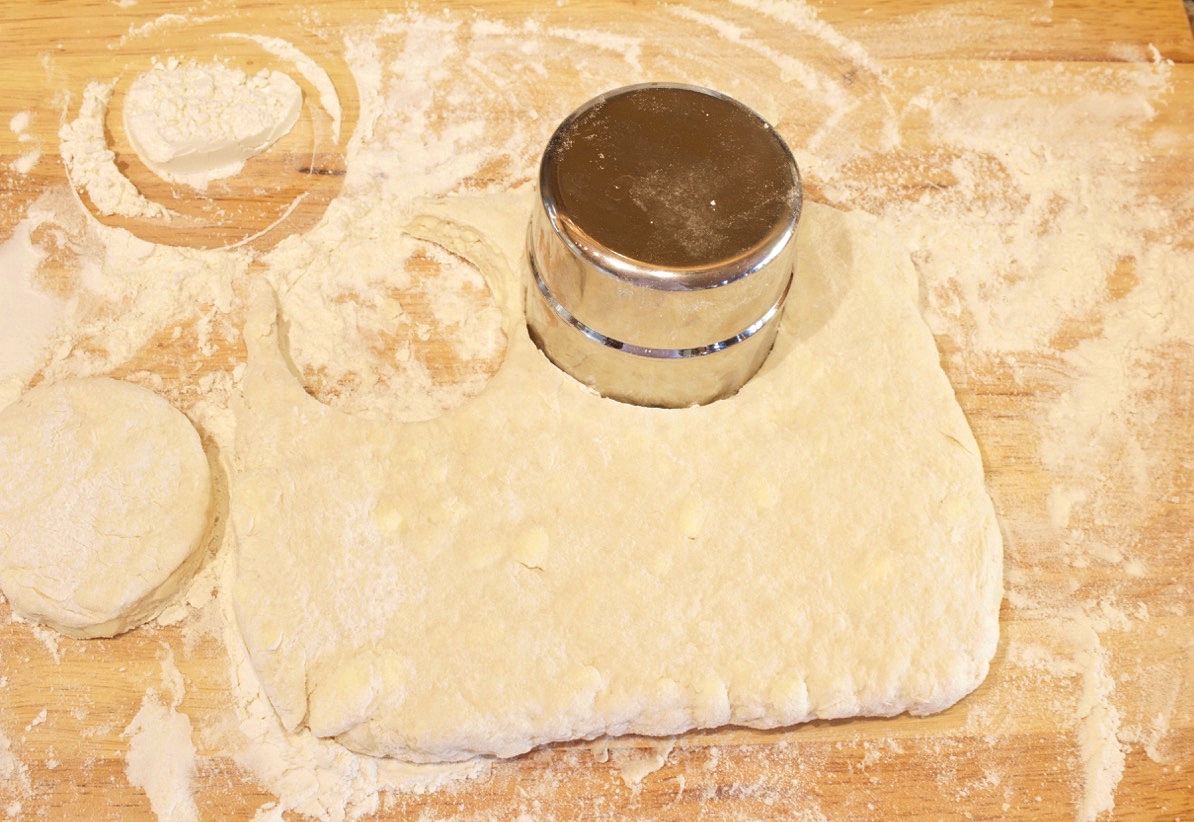
- Cutting the biscuits: Do not twist the biscuit cutter, and dip it in flour between each cut. Press the cutter straight down and pull it straight up from the dough. This is something my mother taught me when I was 5 years old in the kitchen. Why not twist? Because if you twist the cutter, you will not only smoosh the sides of the dough, resulting in uneven biscuits, but you will seal the edges of the dough preventing them from rising.
- Baking Powder: Baking powder is a star ingredient in almost all biscuit recipes. Baking powder is what causes biscuits to rise tall. It’s very important to check your baking powder for freshness. Baking powder has a short shelf life. Click here to see how to test baking powder for freshness.
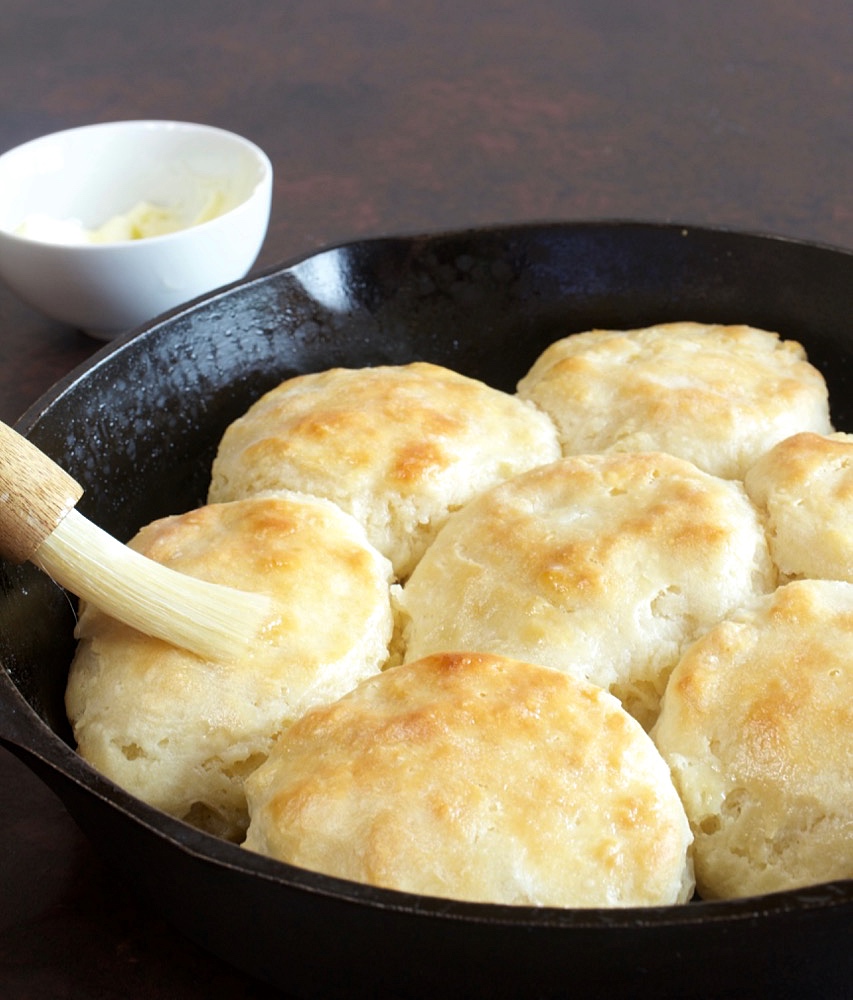
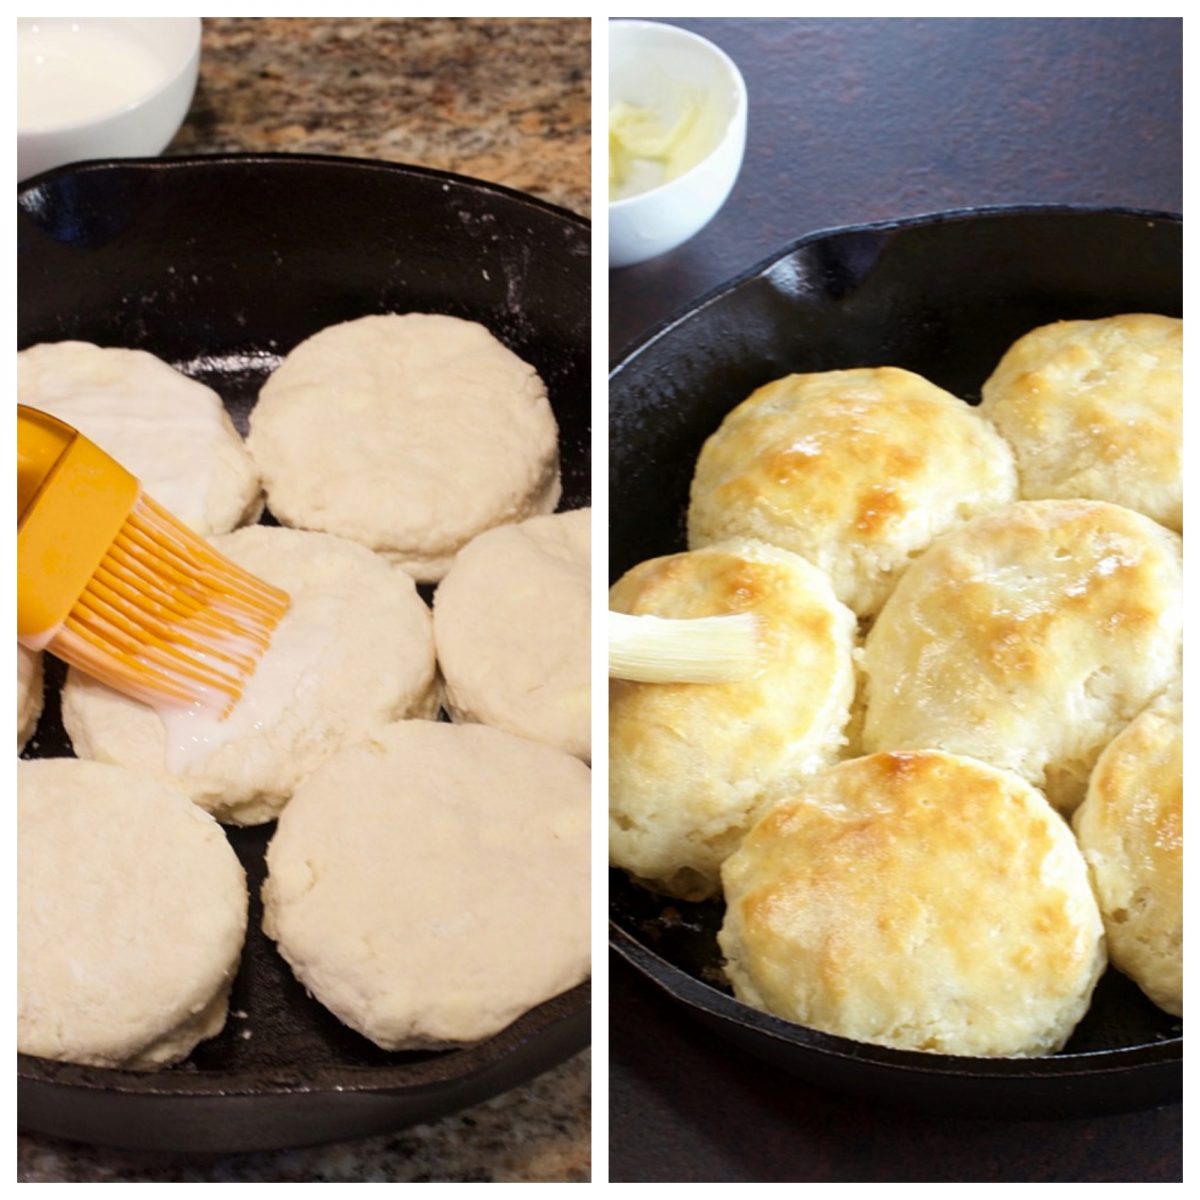
- Place with sides touching in a pan: Place biscuits as close together as possible, preferably with sides touching. They rise taller when placed with sides touching.
TIPS FOR MAKING BISCUITS WITH FLAKY LAYERS (see pictures below)
Fold & Flatten method:
This method is not used for all biscuit recipes. Only for recipes where you want lots of flaky layers. Sometimes I don’t want a biscuit with lots of flaky layers, like when I know I’m going to smother them with gravy. It’s a personal preference thing. However, if you do want lots of flaky layers, use the fold & flatten method.
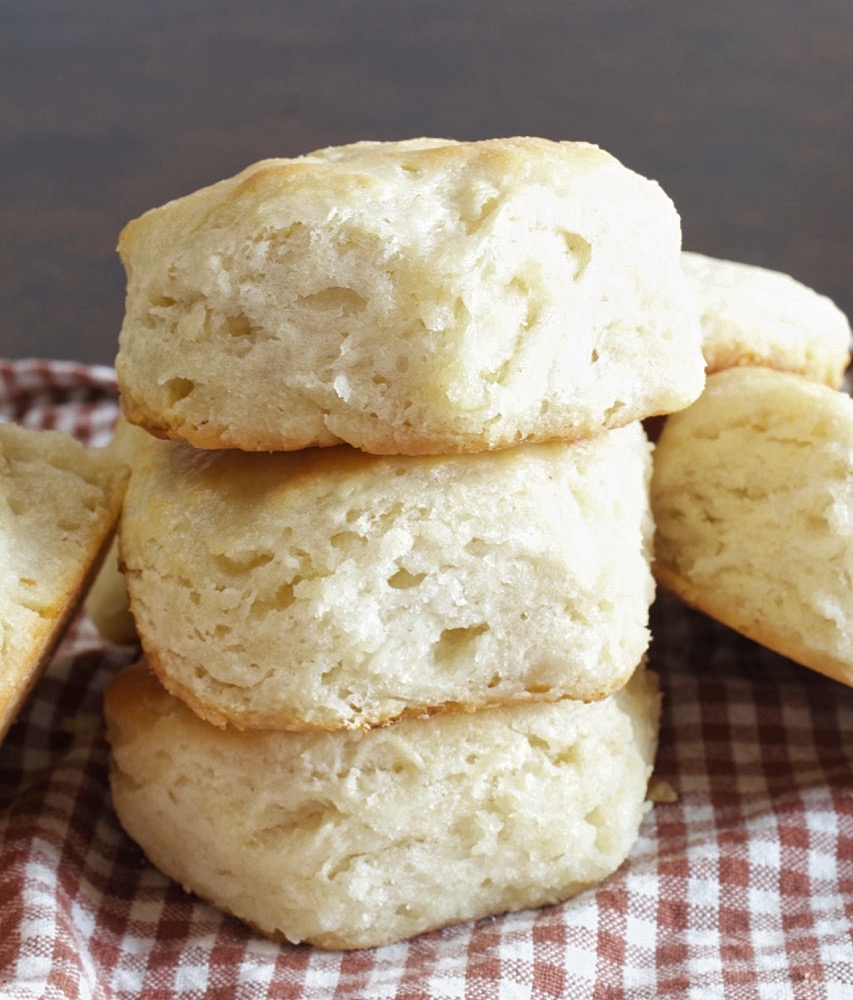
The dough gets patted into a rectangle. Then (in the picture below), the right side of the dough gets folded into the center, followed by the left side. The dough will get flattened into a rectangle again, and the process repeated at least 2 more times, a total of 5 times for the ultimate amount of flay layers. In this recipe, I did the fold & flatten method 3 times.
In the picture below, I patted the dough out to 1/2 inch in thickness. I used a 3-inch round biscuit cutter to cut the dough, making sure I pressed straight down and back up, without twisting the cutter. I also cut the biscuits as close to each other as possible, resulting in less scrap dough that had to be re-worked.
If you want biscuits that are taller, feel free to use a smaller cutter, and only pat the dough out to 3/4 inch in thickness. It’s simply a personal preference thing.
Brushing the tops
The biscuits get brushed with buttermilk just before they get baked. The buttermilk promotes even browning on the tops. Once the biscuits are baked, they get brushed with very soft or melted butter.
What type of biscuit do you prefer? If you’re looking for a good biscuit to smother in gravy, you might be like me and not want fancy flaky layers. In that case, you might want to check out my Big Fluffy Buttermilk Biscuits or my Soft & Tender Drop biscuits.
CHECK OUT MORE YUMMY BISCUIT RECIPES…
Buttermilk Butter Dip Biscuits
Sweet Blueberry Biscuits with Lemon Glaze
If you make this recipe please rate it, and leave a comment below on how you liked it. I love getting your feedback! 🙂
Wanna see different recipes each day? Feel free to follow me on Facebook, Pinterest, & Instagram!
Print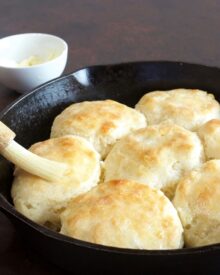
Tender & Flaky Buttermilk Biscuits
- Prep Time: 15 Minutes
- Cook Time: 16 – 17 Minutes
- Total Time: 6 minute
- Yield: 9 large biscuits 1x
- Category: Bread
- Method: Bake
- Cuisine: American
Description
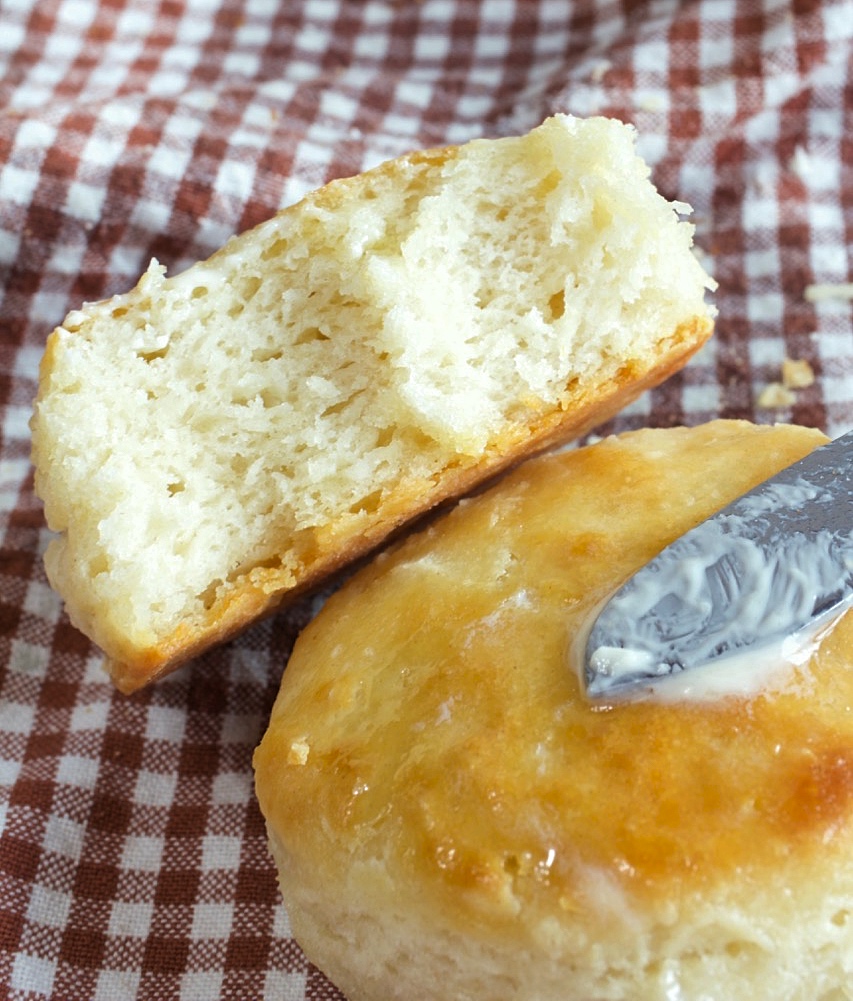
These buttermilk biscuits are soft & buttery and have lots of flaky layers. They take no time to make and they’ll become your favorite biscuit recipe.
Ingredients
- 2 cups all-purpose flour, spoon and leveled
- 1 tablespoon baking powder
- 1/4 teaspoon baking soda
- 1/2 teaspoon salt
- 1 tablespoon granulated sugar
- 1 stick very cold unsalted butter
- 1 cup plus 2 tablespoons full-fat buttermilk
- Very soft or melted butter for brushing baked biscuits
Instructions
Preheat oven to 425 degrees.
- Grease a 9-inch iron skillet and set aside. If you don’t have an iron skillet lightly grease a round cake pan or small cookie sheet. I don’t recommend buttering your skillet or pan. Butter causes biscuits to brown too much on the bottom before the tops get brown enough. I always use solid Crisco shortening to grease my pan, but liquid shortening should work too.
- Add the flour, baking powder, baking soda, salt and sugar to a large bowl. Use a fork or whisk to thoroughly combine the dry ingredients.
- Cut the stick of butter into 3 long pieces. Flip the butter over one turn and repeat. (see picture above). Now slice the butter off into small chunks and transfer them to the bowl of flour. Using a pastry cutter, cut the butter into the flour until the butter is about the size of peas.
- Make a well in the center of the flour and pour 1 cup plus 2 tablespoons of buttermilk into the well. Using a wooden spoon or spatula, gently fold the flour into the buttermilk and mix just slightly until all of the flour is wet. It’s important to not overwork the dough. Overworking the dough will result in tough biscuits.
- Transfer the dough to a floured work surface. Using floured hands, pat the dough into a rectangle, about 8 x 10 inches or so. It doesn’t have to be a specific size, just big enough to fold. Gently fold one side of the dough into the center, then fold the other side into the center. Turn the dough so that it’s horizontally in front of you. Lightly press the dough out into a rectangle again. Turn one side of the dough into the center, then the other. Repeat this process one more time, a total of 3 times.
- Using your hands, pat the dough into a rectangle, about 3/4″ in thickness. You can use a rolling pin if you prefer. Using a sharp biscuit cutter, cut the biscuits by cutting down through the dough and straight up. It’s important to not twist the cutter. Cut them as close together as possible. Gather up any scraps and rework the dough as little as possible and cut out with the cutter. Try to use a cutter that is at least 2.25 inches in diameter if you want pretty good sized biscuits. I used a 3-inch cutter.
- Transfer the biscuit rounds to the greased skillet or pan, making sure they are close together with sides touching. Brush the tops with buttermilk.
- Bake for approximately 17-18 minutes until biscuits are golden brown on top.
- Brush the tops with very soft or melted butter.
- Serve hot with your favorite jam or with gravy.
- Biscuits will stay fresh for up to 1 day at room temperature.
Notes
- I used a 3-inch cookie cutter for these biscuits and they made 9 large biscuits. If you use a smaller cookie cutter, you’ll get more biscuits.
- I usually place my butter in the freezer for about 10 minutes prior to making my biscuits. It should be very cold but not frozen.
Can I make this recipe with vegan buttermilk? Aka plant based milk like oat + an acid like ACV?
Hi Matty, I haven’t tried it but I don’t see why not as long as you’re adding an acid to it.
Thank you for the recipe! I made these for breakfast, so I was half asleep while baking and they still turned out fantastic! I used nonfat Greek yogurt and milk, and added a bit of lemon juice.
Hi Janet,
I’m so glad you liked them, and thanks for the tips on using the yogurt and milk. 🙂
Cindy
I have not tried them yet going to this week. But what about storing extra dough for another day?
Hi Misty, Since this recipe has baking powder you can store them for up to 1 day in the refrigerator. I don’t suggest storing the dough for more than a day. Alternately, you can go ahead and cut out the biscuits, place them on a cookie sheet and freeze them. Once they’re frozen, you can place them in a freezer bag and leave them frozen, then bake them straight from the freezer.
Best. Biscuits. Ever.
I made these biscuits for the first time this morning and they were a huge hit! So soft and fluffy and great flavor! I don’t think my husband or two grown sons will ever want me to make any other kind! Thanks for all the wonderful tips too.
I will admit to a shortcut I took for time’s sake. After mixing the dough, I gently spread it in a 9×13 pan (1 1/2 recipe) and baked. That’s it! I just cut them in squares when they were done. They were great this way and a real timesaver!
HI Kim,
I’m so glad they were a hit and thanks for the shortcut tip!
I’m an experienced baker but never tried to make buttermilk biscuits before. This recipe was one of those where it doesn’t look right but I followed the recipe anyway because I’d never made that particular item before. The dough seemed entirely too wet. I checked all measurements 3 times to make sure I didn’t read or do something wrong. These definitely did not come together correctly. There was too much liquid and they didn’t get a proper rise in the oven and burned on the bottom even though the tops were perfectly golden brown. This despite following all instructions to a T. I’m really sad because they were really messy and I used homemade butter (maybe this was the issue?) so it was a waste of the time/ingredients it took to make the butter, too. They were so bad I will not even attempt to try again and make adjustments.
Hi Murasaki, I’m sorry your biscuits didn’t turn out. Homemade butter is not quite the same as store-bought. The ending result in making homemade butter depends on how thoroughly you extract the buttermilk when making it. If there’s too much buttermilk in your butter, this can result in too much liquid in your biscuits. Also, the butter needs to be very cold for this recipe and cut into the flour. You should not butter the bottom of your skillet or pan. This causes biscuits to over-brown on the bottoms. I use Crisco, as noted in the recipe. I hope this is helpful. 🙂
I followed the directions and also found they had too much liquid..
Hi Stacy, This dough will be pretty wet. However, the amount of buttermilk is added purposely, for a tender biscuit. The biscuit dough gets worked on a generously floured work surface, where as much flour can be added as needed at that time. If you add too much flour and not enough liquid, the result is a dry biscuit. I hope this helps.
Hello from Oregon! Thank you for this wonderful recipe! I loved it and I love using cast iron skillets to make biscuits. My grandma always cooked bacon in hers so she used the bacon fat to grease her skillet before biscuits and then buttered the tops. Mine will never be as good as hers lol (but she cheated as her cast iron skillet is 50 years aged with bacon grease lol. These turned out amazing! thanks again:)
Hi Alecia, I’m so glad they turned out great for you. Cast iron skillets are the best, and such great memories! 🙂
Another hello from Oregon!
Your recipe sounds wonderful. I recently got my first cast iron skillet and have been wanting to use it more.
Question: I don’t ever seem to have buttermilk when I want to use some. Will the “homemade” buttermilk work with your recipe? (regular whole milk + lemon juice)
Thank you and Happy Holidays!
Hi Laurie, Yes it will. Have a great holiday! 🙂
This recipe delicious! I’ve made them several times. I previously used a different recipe but this one is best –Flaky and soft! My family loves them and they are always gone immediately! I haven’t doubled the recipe but am going to have to as they go so quickly!
Love this recipe! Will use this one often. Thank you for sharing!
I’m so glad you liked it. Happy baking!! 🙂
Great recipe I followed it exactly they turned out perfect thank you
We loved these tender, yummy biscuits! Perfect for biscuits & gravy with eggs.. I used half and half with vinegar for the buttermilk & it was perfect.
I’m going to try using this recipe for chicken & dumplings, fingers crossed..
Thanks for this fantastic recipe…
Hi Cyndy, I’m so glad you liked them! 🙂
Thanks so much for sharing this recipe. I have tried several biscuit recipes the last few months and all were a disappointment. They were always too dry.These were amazing. I followed the recipe except for the sugar. I left that out. It’s a reason I stopped buying biscuits at the grocery because of added sugar/sweetners. I cut my butter up and then put it back in the fridge until I was ready to use it. The dough is wet but it’s what makes them so soft and fluffy. I had to have hubby sprinkle some flour on my hands a couple times but he didn’t complain. I used a 9” cake pan and put them very close together. Also greasing the pan was a plus I think. None of the other recipes I tried called for that. I used my hands to roll out dough and not my rolling pin. Also thanks for the tip about not twisting the biscuit cutter. Never knew that and I always did it. Definitely will make these again.
Hi Debra, I’m so glad you liked them! They’re one of my favorites! 🙂