The Ultimate Lemon Cheesecake
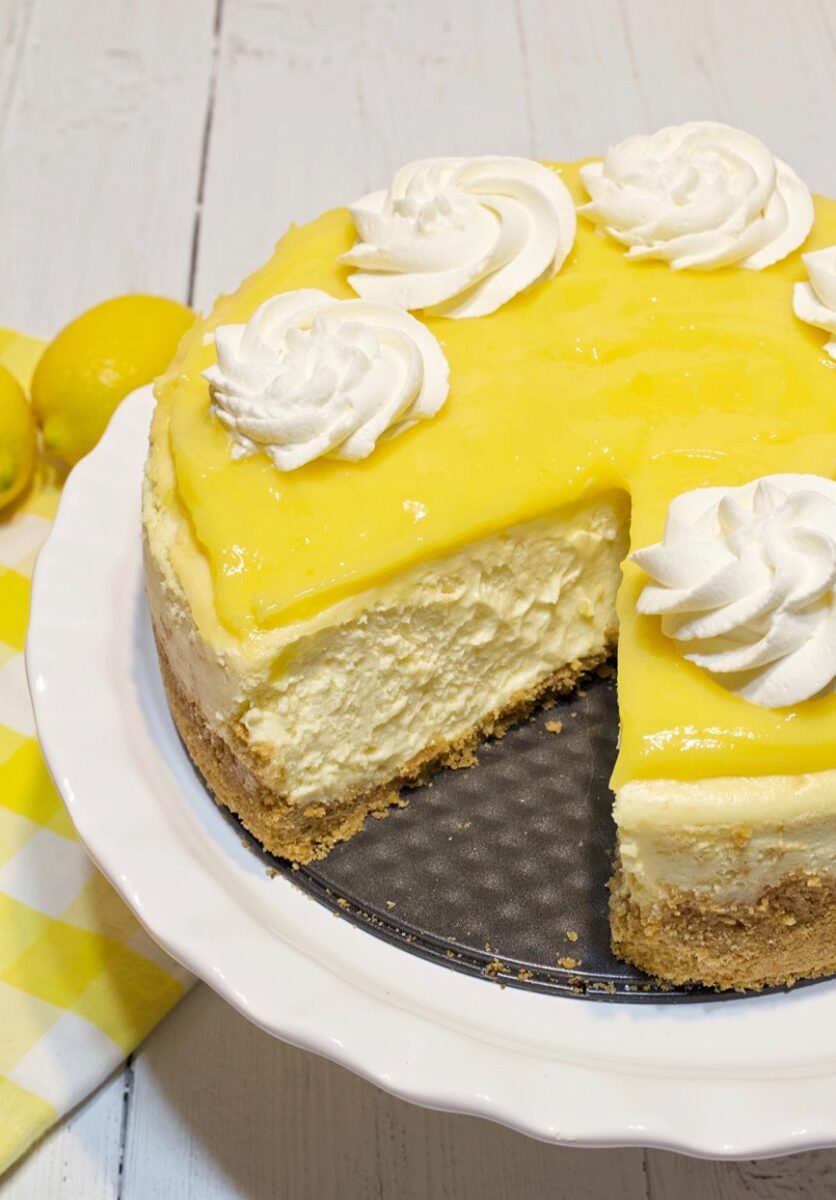
The Ultimate Lemon Cheesecake offers an ultra-creamy lemon filling atop a buttery graham cracker crust, and it’s topped with off-the-chart homemade tart lemon curd. Homemade whipped cream is the perfect finish for this delectable tangy cheesecake.
If you’re not a lemon lover, I profusely apologize for yet another lemon dessert recipe. There’s something about tangy lemon desserts that remind me of Spring and I’m chomping at the bit for Spring to arrive.
If you love cheesecake but feel intimidated by making it or have made cheesecake and it turned out dry and cracked, you’ve come to the right place. I’m here to show you how to make a perfectly creamy, smooth cheesecake with no cracks. It’s really not hard, I promise!
DO I NEED TO USE A SPRINGFORM PAN?
The answer is YES. Cheesecakes need a deep pan, deeper than a normal cake pan. Also, cheesecakes cannot be inverted onto a cooling rack like normal cakes. They need to be cooled in an upright position. A springform pan is perfect for this. It has a removable bottom and the metal ring around the cheesecake gets unlatched and lifted right off the cooled cheesecake. Springform pans aren’t very expensive and you can buy them almost anywhere. In this recipe, I used a 9-inch springform pan. It is the perfect size for the amount of filling and crust in this recipe.
HOW TO MAKE A GRAHAM CRACKER CRUST

A good graham cracker crust combines the perfect ratio of butter to cracker crumbs. The crumbs should be moist enough to hold together. The drier…the more crumbly, and we don’t want crumbly. For this recipe, I used 2 cups of graham cracker crumbs, a pinch of salt, 2 tablespoons of sugar, and 6 tablespoons of melted butter.
Grind up the crackers in a food processor until they are very fine, or place them in a plastic bag and use a rolling pin to crush them. I don’t do either…I’m old school. I spread 3 to 4 at a time out on a piece of wax paper and roll my heavy marble rolling pin over them until they are crushed very fine. Regardless of how you crush them make sure they’re fine.
Use a flat bottomed measuring cup to lightly press the cracker crumbs across the bottom and about 1 inch up the sides of the pan. I sometimes use to fingers to press the crumbs into the sides.
Bake the empty crust in a preheated 350-degree oven for about 8 to10 minutes. This will set the crust. Remove the crust and set it aside to finish firming up while you make the filling.
OTHER CRUST OPTIONS:
You don’t have to stick to the classic graham cracker crust. There are other options such as chocolate graham crackers, vanilla wafers, gingersnaps, or even chocolate wafers. Pick your favorite!
TIPS FOR MAKING THE PERFECT SATINY SMOOTH FILLING
The star ingredient is cream cheese. Here are my tips for making the most satiny smooth cheesecake filling…
- Use only full-fat 8-ounce bricks of cream cheese…no fat-free and no spreadable.
- Make sure the cream cheese is softened to room temperature. If you’re pressed for time, you can microwave the cream cheese for about 30 seconds, (but no more). It needs to be soft enough to whisk easily, and there should not be any lumps when you whisk it. If there are lumps, the cream cheese is not soft enough and no matter how long you beat it, the end result will be a cheesecake with tiny lumps throughout.
- Use the paddle or whisk attachment on your mixer, (I prefer the whisk attachment), and whisk the cream cheese at medium-high speed until it is very light and creamy before you add any additional ingredients.
- Add the sugar and lemon zest and thoroughly incorporate them into the cream cheese before adding eggs. This means beating the sugar into the cream cheese until the cream cheese becomes very light and creamy again, not grainy looking.
- Add the eggs, one at a time, mixing until each egg is incorporated.
- Once the last ingredients are added, mix to incorporate but do not overmix. There’s no need to keep mixing the filling once you’ve incorporated all of the ingredients.
PREPARING THE WATER BATH

A water bath is so essential when it comes to making a satiny smooth creamy cheesecake. The water bath adds moistness to the cheesecake and helps to prevent cracks in the cheesecake.
- Make sure to use a baking pan that’s wide and deep enough for the springform pan to fit in. I happen to have a half sheet cake pan, so that’s what I use, but you can you a roasting pan or any other pan that is wide and deep enough.
- Don’t over-fill the pan with water. One inch of water is plenty to produce enough steam to keep the cheesecake moist. The higher the water level, the higher the chance of some water splattering over into the cheesecake.
- Make sure the water in the pan is very hot, before transferring the cheesecake to it. Do not use cold water.
TWO WAYS TO PREPARE THE WATER BATH
- Add hot water to the water bath pan in a preheated oven. Prepare the cheesecake and carefully transfer it to the pan of water.
- Place the cheesecake in the empty water bath pan. Carefully pour hot water into the pan around the cheesecake, making sure it doesn’t splatter into the cheesecake.
WATERPROOFING THE SPRINGFORM PAN
- Make sure the springform pan is totally protected from the water. If water seeps into the bottom of the pan, you’ll have a soggy crust and we don’t want that.
- Use HEAVY-DUTY foil. Tear off a large square piece that is large enough to go across the underneath and up the outsides of the pan. Fold the edges of the foil up and around the pan, folding the foil inward right below the rim.
TIPS FOR A NO-CRACK CHEESECAKE
- Don’t open the oven door while the cheesecake is baking. Only open the door when the cheesecake is almost done, to check it.
- Don’t over-bake the cheesecake. The cheesecake should start to look just slightly browned around the edges and it should look dry on top. It should still be just slightly jiggly in the center when you gently shake the pan. Once the oven is turned off there will still be residue baking for a few minutes, and the cheesecake will also set up when cooled. It’s also always better to slightly underbake rather than overbake a cheesecake.
- Cool the baked cheesecake slowly!! Turn off the oven and leave the door slightly ajar. I place a wooden spoon between the door and the oven. Allow the cheesecake to cool in the water bath for an hour before removing it from the oven.
- Run a sharp thin knife around the inside edges of the pan as soon as you remove the cheesecake from the oven, but don’t remove the metal ring.
LEMON CURD
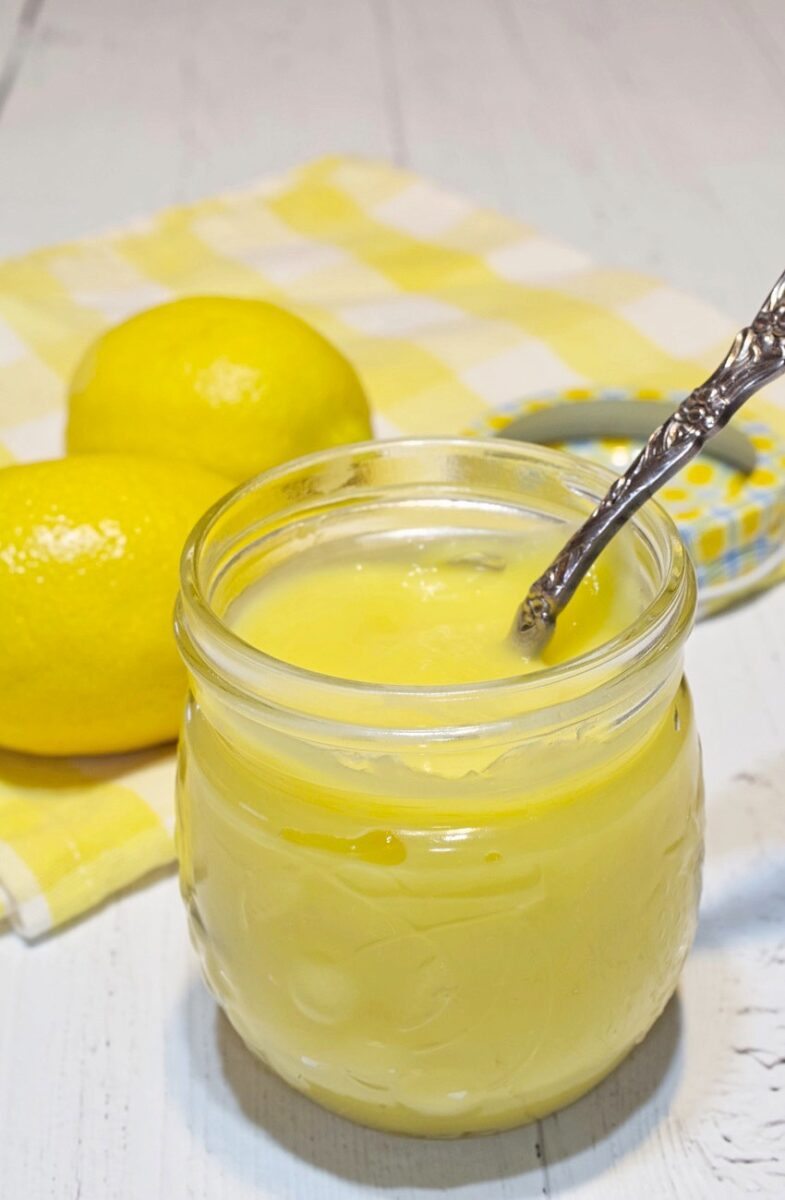
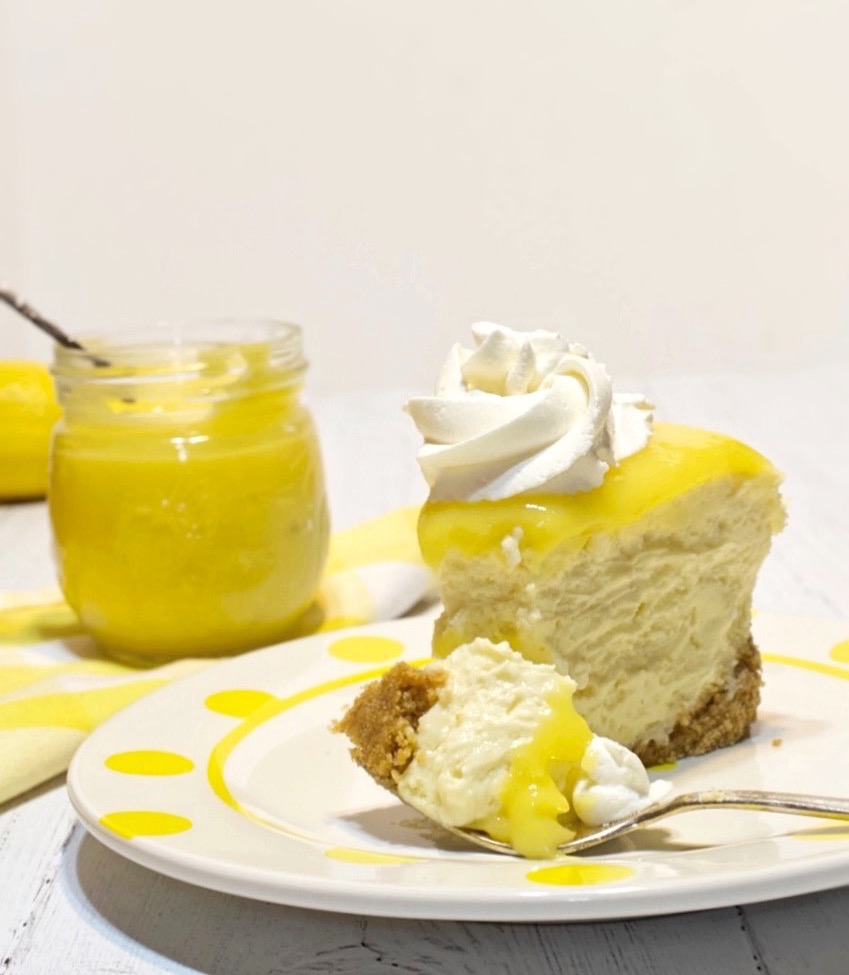
I wanted to make the ULTIMATE Lemon Cheesecake, therefore, lemon curd had to fit into the equation, and I’m talking about HOMEMADE LEMON CURD. Homemade lemon curd is SO easy to make and you can make it in advance. It will keep several days in the refrigerator. You can buy lemon curd at the grocery store, but why make a delicious homemade lemon cheesecake and then take a shortcut with store-bought lemon curd. I spread a generous layer of lemon curd over the cheesecake after chilling it overnight.
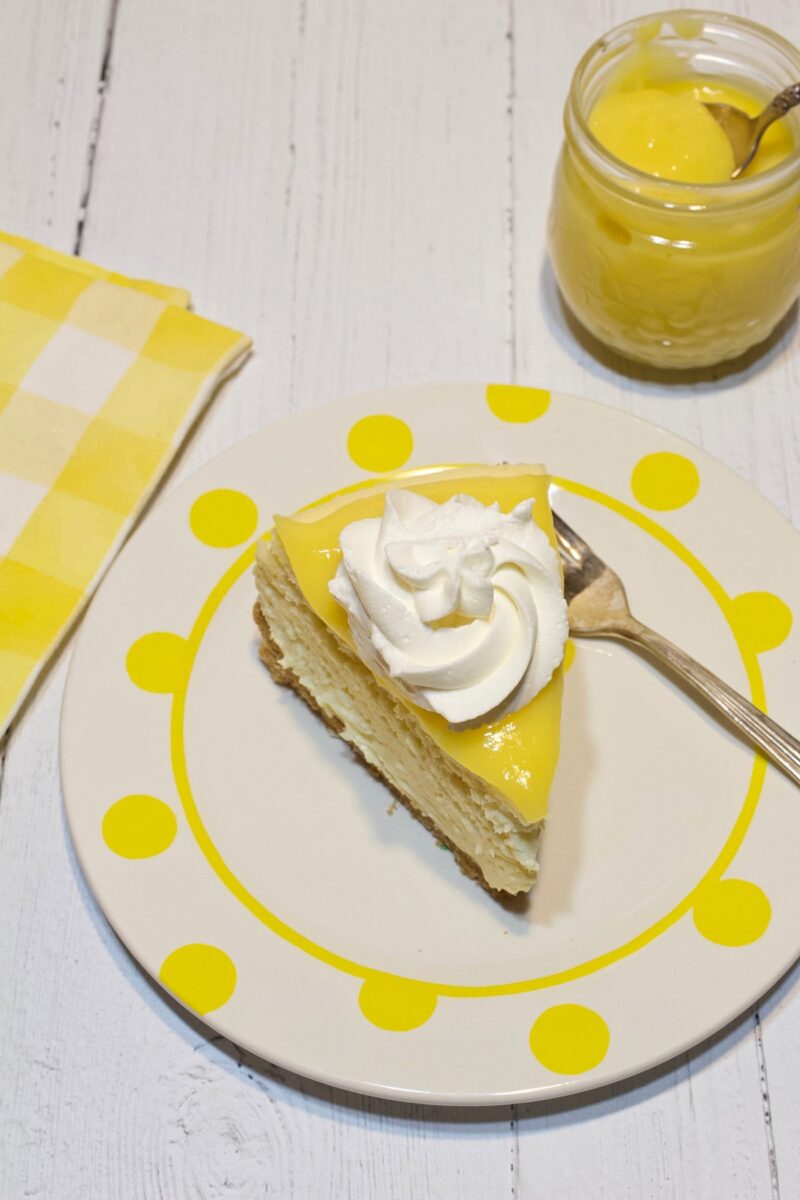
The whipped cream is optional but again, EASY! It takes 5 minutes to make. I love the whipped cream because it’s a great complement to the tart/tangy lemon filling.
Even if you do end up with a slight crack in your cheesecake, don’t fret. You can cover the top with curd, fruit, fruit compote, whipped cream. The list of toppings is endless!
Check out these other delicious lemon desserts…
Lemon Bars with Tender Shortbread Crust
Lemon Butter Shortbread Cookies with Lemon Glaze
If you make this recipe please rate it and leave a comment below on how you liked it. I love getting your feedback! 🙂
Wanna see different recipes each day? Feel free to follow me on Facebook, Pinterest, & Instagram.
Print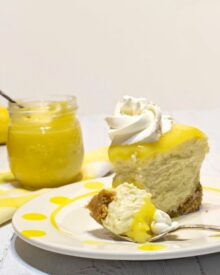
The Ultimate Lemon Cheesecake
- Prep Time: 2 hours
- Cook Time: 90 minutes
- Total Time: 3 hours 30 minutes
- Yield: 10 - 12 servings 1x
- Category: Dessert
- Method: Bake
Description
This Lemon Cheesecake offers an ultra-creamy lemon filling and it’s topped with off-the-chart homemade lemon curd. Dollops of homemade whipped cream are the perfect finish for this delectable tangy cheesecake. This is the perfect dessert for a special occasion!
Ingredients
CRUST
- 2 cups graham cracker crumbs (about 13)
- 6 tablespoons butter, melted
- 2 tablespoons granulated sugar
- pinch of salt
FILLING
- 4 – 8 oz. packages cream cheese, softened
- 1 1/4 cups granulated sugar
- 2 teaspoons lemon zest
- 4 large eggs, room temperature
- 1/4 cup fresh lemon juice
- 1 teaspoon pure vanilla extract
- 1 cup sour cream
- 1 tablespoon flour
- 1/2 cup heavy whipping cream
TOPPING
- 1 cup lemon curd, homemade, or store-bought
WHIPPED CREAM (Optional)
- 1 cup heavy whipping cream
- 1 tablespoon cornstarch
- 3 tablespoons powdered sugar
- 1 teaspoon pure vanilla extract
Instructions
CRUST
- Preheat oven to 350 degrees.
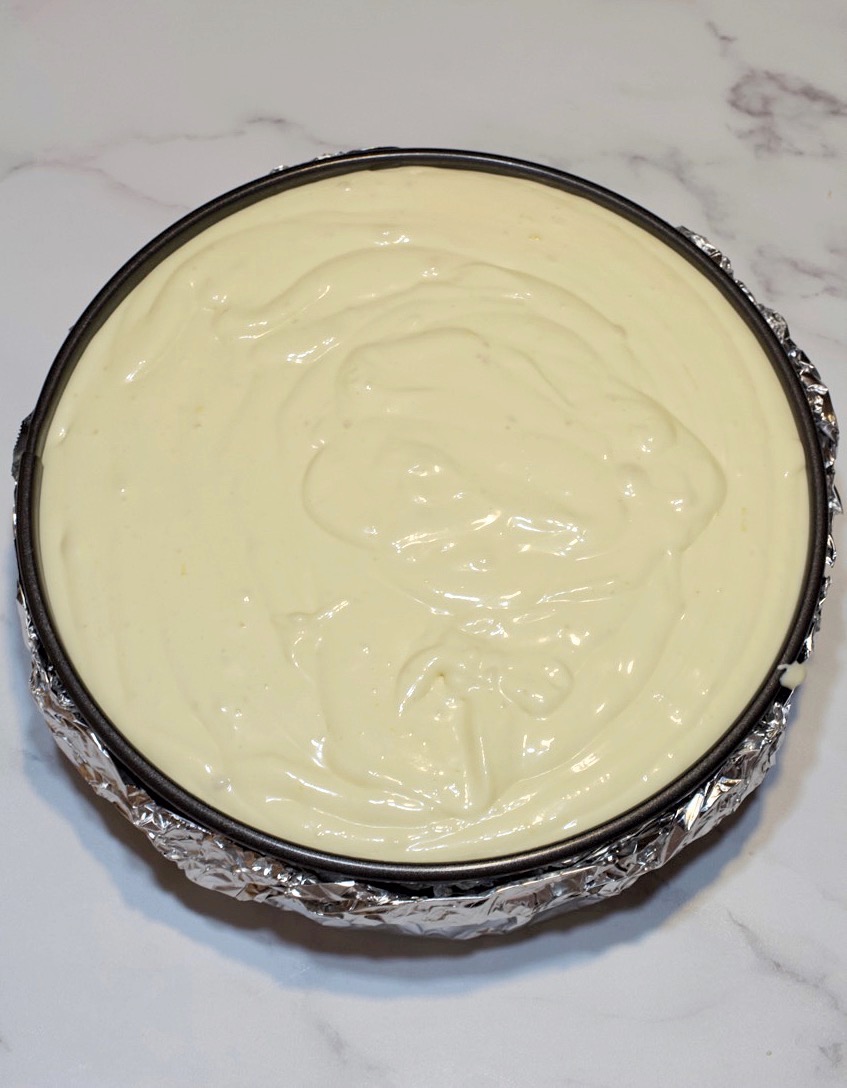
- Prepare a 9-inch springform pan, by wrapping heavy foil around the bottom and sides. This prevents water from the water bath from seeping into the pan.
- Combine the graham cracker crumbs, butter, sugar, and salt in a medium bowl, making sure all of the graham cracker crumbs are moistened.
- Transfer the mixture to the springform pan. Using a measuring cup with a flat bottom, lightly press the mixture into the bottom and about 1-inch up the sides of the pan. Bake for approximately 8 to 10 minutes until the crust is set and you can start to smell it. Remove it from the oven and set it aside. Reduce oven temperature to 325 degrees.
- Place a baking pan (large enough to hold the springform pan) in the oven. Fill it with at least 1-inch of hot water. Leave it in the oven while you’re preparing the filling. I use a 2-inch deep large half sheet cake pan for this, but you can use any baking pan that will work, such as a roasting pan.
FILLING
- Add the cream cheese to the bowl of a stand mixer, or use a hand mixer. I prefer to use the whisk attachment when mixing cream cheese. Whisk the cream cheese on medium speed until it’s very light and creamy, about 1 1/2 minutes. Scrape down the sides and bottom of the bowl and mix again. There should be absolutely NO lumps in the cream cheese.
- Combine the sugar and lemon zest together and add to the cream cheese. Mix on medium speed for about 1 minute. Add the eggs, one at a time, mixing thoroughly after each addition and scraping down the sides of the bowl as needed.
- Add the lemon juice, vanilla, sour cream, flour, and whipping cream. Mix on medium-low speed for about 30 seconds. Scrape down the sides and bottom of the bowl and mix for just a few seconds until combined, but do not overmix.
- Pour the filling over the crust in the pan. Gently shake the pan to level out the filling, making sure not to tear the foil around the pan. Gently transfer the springform pan to the water bath in the oven, being careful not to splash water into the cheesecake filling.
- Bake the cheesecake for approximately 90 minutes or until the center is just slightly jiggly and the sides start to slightly puff up. The top will look dry, but the center should still be slightly jiggly. Do not over bake: If you bake until the center is no longer jiggly, you’ve over-baked it.
- Turn off the oven. Crack the oven door open, using the handle of a wooden spoon. Allow the cheesecake to cool in the water bath for about 1 hour. Remove the cheesecake from the oven and remove the foil from around it. Transfer the cheesecake to a wire rack. Run a thin knife around the inside edges of the pan to loosen the sides of the cheesecake. Allow the cheesecake to completely cool on the wire rack, 11/2 to 2 hours. Do not refrigerate the cheesecake to finish cooling it. Allow it to cool slowly at room temperature.
- Once cooled, wrap the cheesecake securely in plastic wrap and refrigerate overnight.
TOPPING
- Once the cheesecake is chilled and set, spread the lemon curd over the top, stopping about 1/4 inch from the edge.
WHIPPED CREAM (Optional)
- Add the whipping cream to a mixing bowl and whisk on medium speed until soft peaks form. I place a towel over my stand mixer to prevent the whipping cream from splattering everywhere. Add the cornstarch, powdered sugar, and vanilla. Whisk on high speed until stiff peaks form. Pipe or dollop the whipped cream around the edges of the cheesecake. I piped them using a Wilton 1B tip. You can also garnish by placing half lemon slices on each dollop of whipped cream if desired.
- Serve and refrigerate leftovers for up to 4 days.
SLICING TIP
If you want nice neat slices of cheesecake, use a thin, sharp, long knife. Dip the knife in hot water, wipe the knife dry, slice through the cheesecake one time. Wipe the knife clean and repeat for each cut.
Notes
- If you’re using homemade lemon curd, it can be made several days in advance and refrigerated.
- Please read all of my tips above this recipe before making it. It will help you to make the perfect cheesecake!
I was wondering why you use cornstarch in the whipping cream?
Hi Cathy, It works as a stabilizer if you want to leave the whipped cream sitting out for a long time. Some people use gelatin. You don’t have to use either one if you’re not leaving the dessert out of the refrigerator for a long period of time.
Hi Cindy,
I absolutely adore this recipe! Thank you for sharing!
I’ve made it 3 times already but some reason this last time the crust was smushy I’m guessing too much water. Any tips on how to fix this in the future or Is the cheesecake done for at that point . Thanks!
Hi Victoria, Hmmm. Did you remember to prebake the crust the last time? If you did prebake it, maybe try leaving it in the oven for an extra minute. The only other thing I can think of is if you accidentally added too much butter or not enough graham crackers. I hope it turns out for you next time. 🙂
Is it possible to make the cheesecake but omit the lemon flavoring? I love lemon but my husband does not.
Hi Nancy, Yes, but you might want to look at my regular New York Cheesecake recipe, https://mycountrytable.com/creamy-new-york-cheesecake-with-strawberry-compote/.
Can the sour cream be left out of the cheesecake filling? We aren’t fans of the “wet” type of cheesecake.
Thank you!
Hi Michelle, You can leave it out, and it will definitely be a dry cheesecake.